Quantizing is one of the most important editing functions in SONAR. You use this feature to correct timing errors you make when recording from a MIDI instrument or to adjust the timing of audio clips.
Very few musicians are capable of performing in perfect time. As you play, you are likely to strike some notes slightly before or after the beat or to hold some notes slightly longer than you intended. The
Quantize commands can help to correct these types of timing mistakes.
These commands have quite a few settings, making them very flexible and powerful. In addition, both of these commands let you create, save, and re-use presets. This means that once you find the settings you like, you can save them and then apply them to other projects in a consistent way.
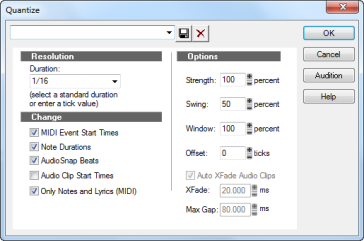
The resolution indicates the spacing of the grid. You can use any value from a whole note down to a thirty-second note triplet. You can also specify resolution in clock ticks. A rule of thumb is to select a resolution that matches the smallest note in the region you are quantizing. If you are quantizing a run of sixteenth notes, use a sixteenth note as the resolution. If you are quantizing a mix of sixteenth and eighth notes, you should still use a sixteenth note. At the default timebase of 480 PPQ, 480 clock ticks is equal to quarter-note resolution.
When you use Groove Quantize, SONAR creates a grid at the desired resolution on top of the notes in the groove. For example, if the groove contains only quarter notes but you choose sixteenth-note resolution, SONAR builds the grid by dividing the space between each quarter note into four equal sections. In places where the groove file contains no notes, SONAR builds a fixed grid of the desired resolution.
Normally, the resolution grid is aligned evenly with the start of measures and beats. As an option, you can shift the grid earlier or later by any desired number of clock ticks. If the resolution is a quarter note and you’ve set the offset to +3 ticks, then a note that is originally near 1:01:000 would be moved to 1:01:003—three ticks beyond the beat boundary.
As an option, SONAR can adjust the duration of note events so that each note ends one clock tick before the start of the nearest resolution-sized note. This ensures that the notes do not overlap, which can cause problems on some synthesizers. The adjustment may lengthen the duration of some notes and shorten the duration of others.
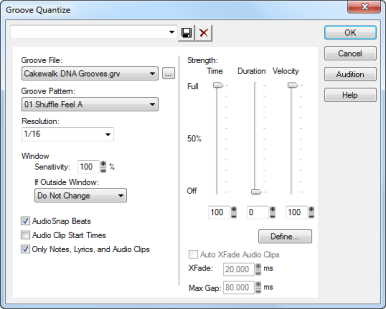
When you use Groove Quantize, the duration adjustment compares the note length to the duration of the sample note in the groove. If no duration information is available, SONAR uses the distance to the start of the groove event closest to the end of the note.
The velocity adjustment, which is only available with the Groove Quantize command, adjusts the note velocity to the velocity of the corresponding notes in the groove.
The human ear is tuned to the slight “imperfections” we hear from most musicians. If you quantize a project so that all notes are perfectly in position, it may end up sounding mechanical or rigid. To avoid this, SONAR lets you adjust the
strength of the adjustment. A strength of 100 percent indicates that all notes are moved so that they are in perfect time, while a strength of 50 percent means that all notes are moved half-way towards the desired position. This lets you “tighten up” the timing as much as you want, without going too far.
The Groove Quantize command also lets you control the strength of duration and velocity adjustments. As you work with this command, you will notice that the note start time has a greater effect than the duration on the rhythmic feel of the track. For this reason, changing the starting times (time strength close to 100 percent) has a more noticeable effect than changing durations (duration strength close to 100 percent). However, there are situations in which you might want to change both to avoid ending up with notes that overlap or with unwanted rests.
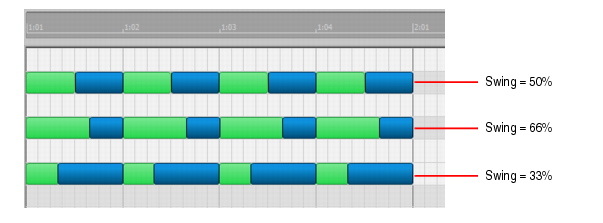
Many projects do not have notes positioned on a perfectly even time grid. For example, projects with a swing feel, though they may be written entirely in eighth notes, are often played more like eighth-note triplets, with the first note extended and the second one shortened. The
Swing option lets you distort the timing grid so each pair of notes is spaced unevenly, giving the quantized material a swing feel.
A swing value of 50 percent (the default) means that the grid points are spaced evenly. A value of 66 percent means that the time between the first and second grid points is twice as long as the time between the second and third points. The following figure illustrates the effect of the swing setting on the timing grid:
When you quantize some portion of a project, you might not want to adjust notes that are very far from the grid. The
window, or
sensitivity, setting lets you choose how close to the resolution grid a note must be located for quantize to move it.
A window of 100 percent includes all notes and guarantees that all notes will be shifted to lie exactly on the grid. The window extends half the resolution distance before and after the quantization point. A window of 50 percent extends only a quarter of the way toward the adjacent quantization points.
When you use Groove Quantize, you can also perform adjustments on out-of-window events. There are four options:
If you want, you can restrict the types of events that are affected by the Quantize commands to only notes, lyrics, and audio clips. If you choose this option, SONAR will not modify other events, like controllers.
|
2.
|
Choose Process > Quantize to display the Quantize dialog box.
|
|
4.
|
Click Audition if you want to hear how the quantization will sound; press Stop to stop auditioning the change.
|
|
6.
|
Click OK when you are done.
|
|
2.
|
Choose Process > Groove Quantize to display the Groove Quantize dialog box.
|
|
6.
|
Click Audition if you want to hear how the quantization will sound; press Stop to stop auditioning the change.
|
|
9.
|
Click OK when you are done.
|
SONAR quantizes the selected MIDI information and audio clips. You can use Undo to restore the material to its original state. If you saved your settings, you can apply them to any pattern you want by selecting the pattern and choosing a preset from the
Preset field. To delete a group of settings, select the group from the
Preset field and click the
Delete button.
To use the groove quantize feature, you must create or choose a small snippet of music—the groove pattern—for SONAR to use as the timing and accent reference. You can use either of the following:
Any MIDI data that you place onto the Clipboard can be used as a groove pattern. With a carefully defined groove pattern, you can give an old project an entirely new feel. If you like the groove pattern you have created, you can save it to a groove file.
You can add groove patterns to these files from the Clipboard, edit existing patterns, or delete patterns you do not want to keep. There is no limit to the number of groove patterns that can be stored in a single file. You can organize your grooves into several files or keep them all together in a single file. Groove files have an extension of .grv.
|
2.
|
Choose Edit > Copy to place the music onto the Clipboard.
|
You can now use the Groove Quantize command with the Clipboard as the “Groove File.”
|
2.
|
Choose Edit > Copy to place the music onto the Clipboard.
|
|
3.
|
Choose Process > Groove Quantize to display the Groove Quantize dialog box.
|
|
5.
|
Click the Define button to display the Define Groove dialog box.
|
|
10.
|
Click Close when you are done to return to the Groove Quantize dialog box.
|
|
1.
|
Choose Process > Groove Quantize to display the Groove Quantize dialog box.
|
|
3.
|
Click the Define button to display the Define Groove dialog box.
|
|
8.
|
Click Close when you are done to return to the Groove Quantize dialog box.
|
SONAR stores the groove on the Clipboard and chooses the new groove as the current groove source.
|
1.
|
Choose Process > Groove Quantize to display the Groove Quantize dialog box.
|
|
2.
|
Click the Define button to display the Define Groove dialog box.
|
|
5.
|
Click the Delete button, and confirm that you want to delete the groove pattern.
|
|
7.
|
Click Close when you are done to return to the Groove Quantize dialog box.
|
Aligning sloppy tracks with a good one. Select the portion of the “good” track that you want to apply to the “sloppy” tracks and copy it to the Clipboard. Select the portion of the sloppy tracks you want to modify. Choose
Process > Groove Quantize, choose the Clipboard as the groove source, and click
OK.
Accenting beats in each measure. Create a sample measure containing note events at the desired accent points. Give the notes on the accented beats a greater velocity and the others a lesser velocity. Select the measure, copy it to the Clipboard, and then choose
Process > Groove Quantize. Set the velocity strength as high as necessary so that the notes get accented the way you want.
Stealing that feeling. Suppose you have a dry piece that was composed and entered into SONAR with a rigid sense of timing (for example, using step recording). You’ve recorded a bass line that has exactly the off-beat rhythmic dynamic you want for the dry piece. You’d like to force your other tracks to share that feel. Copy the bass track to the Clipboard; from the
Groove Quantize dialog box, select the Clipboard as the groove source; choose a resolution value roughly on the order of the duration of the bass notes and a window of 100 percent. SONAR
aligns the melody note events with the nearest bass notes.
Synchronizing rhythm and solo tracks. If you want to preserve the unique rhythm of each track but want to synchronize them together in time, try a larger resolution value and a smaller window. For example, suppose you have one track with a highly stylized drum beat and another track containing a jazz solo with some very nice runs in it. The drum beats fall primarily on quarter notes, but the solo consists of runs of fast notes that aren’t quite sixteenth triplets. Copy the drum track to the Clipboard, and groove quantize using a quarter-note resolution and a window of perhaps 10 percent. SONAR aligns the solo notes near the quarter-note drum beats but maintains the feel of the solo during the fast runs of notes in between.
Correcting off-tempo tracks. Suppose you have both rhythm and melody tracks recorded, but the melody was played erratically. First, copy the rhythm track to the Clipboard. Then use groove quantize with a whole-note resolution, a window of 25 percent or less, and with the
Scale Time option selected. The
Groove Quantize command will synchronize the melody track with the groove source at roughly measure boundaries, while maintaining the relative timing of the notes in each measure.
Fixing a bad verse. Copy a good verse to the Clipboard. Then change the selected range to cover only the bad verse. Perform a groove quantize using the Clipboard contents as the groove source. The rhythms of the two verses then match.